Thursday, January 27, 2011

A Valentines Day craft...


Are you looking for a simple Valentines Day gift to hand out at the office or to make with your kids? If so, I think this is the perfect craft you.

I have to admit that I actually "scrap-lifted" this from the Martha Stewart website. But don't be nervous, it is easy and you don't need any special tools. 


Tools Needed:
Square patterned or solid card stock
Scissors
Ribbon
Hole punch
Adhesive - double-sided tape or glue dots
Scrap piece card stock at least 5 x 5 in.
You can use any size square. I chose to use a 6 x 6 in. square but you can make yours larger or smaller. First, fold the card stock diagonally in both directions. Then fold it vertically and horizontally. When you unfold the paper you should see 8 triangles.
Draw two opposite corners of the square inward, tucking in the other two corners. See example.
Next, you need to make a heart template. For a 6 x 6 in. square I made a 3 1/2 in. heart. To make the template either use a heart shaped punch or you can print a heart on card stock than cut it out.

Hold the heart on top of the paper with the point of the heart lining up with the closed end of the paper. Cut around the top of the heart. If you are working with children you might want to use a paperclip along the bottom to keep the heart in place.  
Hold the two inside half hearts together like in the example. 
Punch a hole in the center. Secure the heart by adding double sided tape down the front and back seam. Run a ribbon through the hole and tie a bow at the end. The final step is to hang your heart and fill it with your favorite candy. 

Tuesday, January 25, 2011

A treat for your Sweet!


Valentines Day is a few weeks away and I wanted to make something sweet to celebrate! 

My sister-in-law gave me the heart shaped pocket pie mold from Williams-Sonoma for my wedding shower and it has been a fun addition to my kitchen. I made some apple pocket pies a few months ago and they turned out yummy. For Valentines Day I'm making chocolate pies. 

I love making these pies because you can either spend a l-o-n-g day making these or you can break it up steps and make them over several days. Enjoy!

Tools Needed:
Pocket Pie Mold or large heart cookie cutter and a fork
Pastry Board
Rolling Pin
Pastry Brush
Wax Paper
Colored Sugar

Ingredients:
4 - pre-made pie crusts or double the recipe below
Pastry:

  • 9 1/2 ounces all-purpose flour, approximately 2 cups
  • 2 teaspoons baking powder
  • 3/4 teaspoon kosher salt
  • 2 1/2 ounces shortening, approximately 6 tablespoons
  • 3/4 cup milk

Chocolate Filling:
  • 2 1/2 cups sugar
  • 1/4 cup plus 1 tablespoon cocoa powder
  • Pinch kosher salt
  • 10 ounces unsalted butter, room temperature
    I broke this project up over three days. The first day I made the pie crust and refrigerated them. 


    In the bowl combine the flour, baking powder and salt and mix. Add the shortening and knead it into the flour with your hands until it is crumbly. Add the milk all at once and mix in with a spatula until it begins to come together. Lightly flour your hands and the counter top and turn the dough out onto the counter top. Knead the dough ball, folding over 10 to 20 times. Place dough in a zip lock bag and refrigerate or continue to the next step. 


    On the second day, I made the chocolate filling and assembled the pocket pies. 
    Let the dough stand at room temperature for 5 minutes. On a floured surface, roll out 1 dough disk into a round 3/16 inch thick. Brush off the excess flour. Using an apple pocket pie mold, cut out 8 of each shape (4 solid and 4 with the decorative cutout). Re-roll the dough scraps, if necessary, and cut out more shapes. Repeat with the remaining dough disk. If you don't have a fancy pocket pie cutter than use a cookie cutter and seal the edges with a fork.

    Place a solid dough shape in the bottom half of the cutter and gently press the dough into the mold. Fill the center with 2 Tbs. chocolate filling and brush the edges of the dough with some of the egg wash. Top with a shape with a decorative cutout. Press the top half of the cutter down to seal and crimp the edges of the pie. Remove the pie from the mold and place on a wax paper lined baking sheet. Repeat with the remaining dough and filling. Freeze the pies for 30 minutes.


    Resist the urge to overfill them because they will leak. If they end up leaking don't stress. If this happens allow them to cool just a couple mins than take them from the cookie sheet with a spatula and let them cool on a rack. The excess will drip off and they will be beautiful. 


    After they have been in the freezer for 30 minutes you can either proceed to bake the pies or you can move them into a freezer container and freeze them up to 3 months. These pies are awesome because you bake them straight from the freezer. 
    On the third day, I baked the pies on a greased cookie sheet at 400 degrees for 22-25 minutes.


    Sunday, January 23, 2011

    Getting trashed at a 3 year old's birthday party!?!


    Garbage truck center pieces


    I do not have any children yet, however, I'm blessed to have a awesome group of friends that for the most part all have children. I get invited and asked to help with a lot of birthday parties. And I LOVE it! I consider it great practice so when I finally start throwing my own parties, I'm going to be a pro. I thought it would be fun to start sharing these great ideas from my friends with you!


    One of my dear friends has a son that loves GARBAGE! He is obsessed with it. I actually think one of his first words was garbage. For his 3rd birthday, she decided to indulge his obsession and throw him a garbage themed birthday party. I can only imagine the things she saw when she searched garbage truck and trash themed parties on Google. 


    I think she did a awesome job carrying the garbage theme from the invitations all the way down to the kids drinking cups.


     The invitations read "We've tried other angles. He wouldn't hear of it. We've waited it out. He became more devoted! So we sighed and go busy. We knew we were stuck throwing a party around yep... a garbage truck!" Totally fitting and too cute!
    She ordered matching stickers for everyone to wear that said "I got TRASHED at Brennan's 3rd Birthday!" They were a big hit with everyone!
    She had the baker match the truck drawn on the invitations. 
    She found small plastic trash cans online that she filled with gummy worms for favors. She also found disgusting little garbage can drinking cups that the kids drank out of at the party and were able to take home with them.


    I got a idea to make a birthday banner using trash. I cut out 5 1/2 in. triangles using my Cricut. Than I covered each one with newspaper, tinfoil, notebook paper and brown craft paper that I had crumpled. 


    Than I cut out letters and numbers to spell out "Brennan Turns 3". I also cut out two stars to divide the words. I but a bottle cap and button on each star to make it look like we dug the supplies out of the trash. I tied each triangle together with different colored drinking straws I had cut up, paper clips and twine. 


    I think it is safe to say that Brennan had a awesome birthday. The look on his face says it all!

    Friday, January 21, 2011

    Love is in the air...


    Valentines Day is getting close and I wanted to share a few card ideas, as well as, some treat ideas over the next couple weeks. Enjoy!

    Materials list:
    1 - 12 x 12 sheet of cream or white card stock
    1 - Brown card stock
    1 - Patterned piece of paper (pink polka dots on cream paper used in example)
    3 or more colors of darning thread
    Darning needle
    Adhesive
    Paper Trimmer
    Scissors
    Pen or pencil
    Mouse pad or cork board


    I tried to make this card using things that you might have at home already.
    The first step is cutting your card stock.
       Cut cream or white card stock to 10 x 6 1/2 in. then fold it to 5 x 6 1/2 in.
       (you can also purchase pre-made card bases at Michaels in bulk).
       Cut brown card stock to 4 3/4 x 6 1/4 in
       Cut patterned card stock to 4 1/2 x 6 in.

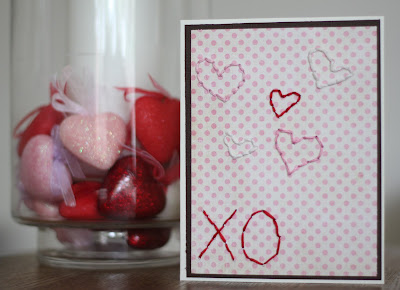
    Next turn your patterned paper over and free hand several hearts and in the right hand corner write OX.


    Than place your patterned card stock on the your mouse pad or cork board and with your darning needle poke holes around your letters and hearts. The trick is to get them close enough so that you get the detail of the shape but not too close that the paper rips when you pull the thread through. When you turn it over it will look like one of those lacing cards you played with in preschool.


     Now you want to thread your needle and start looping your thread through each hole. The back won't look pretty but don't worry no one will see it.


    Now you are almost done. Just adhere your patterned card stock to the brown card stock. Then your brown card stock to your cream or white card and your finished!! These are simple, fast and budget friendly cards to make for Valentines Day. You can play around with spelling out different sayings (just make sure to write them backwards) or you can use some cute glitter letter stickers to spell out your sentiment.

    I'll post a few more card idea using different tools and products soon.

    Thursday, January 20, 2011

    I'm officially blogging....

    I've been sharing recipes and photos on Facebook for a while and someone suggested that I start a blog. I've been kicking the idea around for a while but wasn't sure where to start. So, after thinking up a title and finding a cool background here I am.

    I plan to post recipes and craft projects. Also, I just purchased a Canon Rebel T2i so I'm learning how to use it so I plan to post photos and things I learn about my camera along the way.

    I hope you enjoy my posts and please feel free to share any of your tips or tricks.

    xo,
    Theresa