Saturday, November 12, 2011

Pumpkin Pocket Pies


Aren't pocket pies just the best? They are the perfect single serving size and they have just a little more crust then filling which is perfect for me because I love the crust! During Valentine’s Day, I posted a chocolate pocket pie recipe that was pretty tasty and in honor of fall I wanted to bake up some pumpkin pocket pies.

I searched and searched and searched some more but I couldn’t find a recipe. I found recipes where people took a baked pumpkin pie and used the inside for filling in the pocket pies and I found a couple forums where people said that a traditional pumpkin pie filling was to runny and would just seep out. I was getting ready to forgo my attempt and make apple pies instead but then I came across Joy the Baker and she had posted a recipe for pumpkin poptarts!! Very clever of her! The filling works perfectly inside the pie crust and the coarse sanding sugar sprinkled on top gives each bite a little added crunch.

Ingredients:
2 store-bought pie crusts
3/4 cup pumpkin puree
1 large egg
1/2 tsp pumpkin pie spice
1/2 tsp cinnamon
1/4 tsp salt
1/3 cup granulated sugar or 5 ½ Tbls of Splenda Baking Blend
1 egg white

In a small sauce pan, combine pumpkin and pumpkin pie spice and heat until fragrant about 3-5 mins on medium heat. Remove from heat and transfer to a medium sized mixing bowl. Whisk in egg, salt and sugar and place in the refrigerator while you cut out the dough.

Unroll the store bought crust onto a pastry board and go over it a few times with a rolling pin (I didn't use any flour on the board or rolling pin but you may need to if it is sticky). 

Using a pocket pie mold, cut out 16 of each shape (8 solid and 8 with the decorative cutout). Re-roll the dough scraps, if necessary, and cut out more shapes. Repeat with the remaining dough disk. If you don't have a fancy pocket pie cutter than use a cookie cutter and seal the edges with a fork.

Place a solid dough shape in the bottom half of the cutter and gently press the dough into the mold. Fill the center with 2 Tbs. filling and brush the edges of the dough with some of the egg white. Top with a shape with a decorative cutout. Press the top half of the cutter down to seal and crimp the edges of the pie. Remove the pie from the mold and place on a wax paper lined baking sheet. Repeat with the remaining dough and filling. Brush the top of the pie with egg white and sprinkle coarse sanding sugar on top. Freeze the pies for 30 minutes.


Bake pies on parchment paper or a greased cookie sheet at 400 degrees for 22-25 minutes.


Enjoy!!

Thursday, November 10, 2011

Storing Canned Pumpkin

During the months of October and November I'm always inclined to bake with pumpkin, however, I started encountering an annoying problem. The recipes I used never called for a full can of pumpkin! I checked out the label on the can of Libby's pumpkin and it said that pumpkin can be stored in the refrigerator for one week but that's a lot of pressure! The can also says that it can be stored in the freezer for three weeks.


Last week, I made some pumpkin pocket pies that called for 3/4 cup of pumpkin. I decided that I was going to freeze the rest of the can but I wanted to have it frozen in 1/4 cup portions. I lined a cookie sheet with parchment paper and scooped 1/4 cup servings onto the tray. I flash frozen the scoops for about 45 mins and than I moved them to a large freezer bag. 


Ta-da!! Problem solved, one small step for man; one giant leap for mankind!


Saturday, November 5, 2011

Jambalaya (Slow Cooker)


This was the best jambalaya I have ever had!! It is also the only jambalaya I have ever had. There aren't too many place in California that serve up jambalaya so I've always wanted to try to make my own. I knew my husband would be on board since he loves anything that has sausage in it!


If you follow my blog, you know I love a slow cooker recipe that doesn't take long to prep and doesn't require any browning. This recipe went together really fast! I chopped my meat the night before so all I had to do was dump in all the ingredients when I came home for lunch. 


I'll give you a general warning that this is spicy! If your family isn't into heat, you can omit or cut the cayenne pepper in half and it should only have a mild heat at that point. 


Recipe makes about 4 servings and was adapted from Plain Chicken

Ingredients:
1 chicken breast, cut into 1 inch cubes
2 links of Italian sausage, sliced into 2 inch slices
1-28 ounce can of diced tomatoes
1/4 cup diced onions
2 garlic cloves, minced
1 cup chicken broth
2 tsps dried oregano
1 tsp black pepper
1/2 tsp garlic powder
1/2 tsp onion powder
1/2 tsp paprika
1/2 tsp salt 
1/2 tsp cayenne pepper
1-1/2 cups un-cooked rice (I used Uncle Ben's Original Converted Rice)
1/2 lb shrimp, peeled, deveined and the tales off


Directions:
Combine all the ingredients except the shrimp and rice in the slow cooker and give it a good stir. Cook on low for 5 hours. 


Add rice and shrimp and cook on high for about 30-45 mins longer, until the rice is tender. 


I served my jambalaya with cheddar biscuits and it was a perfect meal!


Enjoy!


Sunday, October 23, 2011

Candy Corn Cupcakes


Candy Corn Cupcakes

Just in time for Halloween!! These cupcake start boxed cake mix with a few modifications to the ingredients and end with homemade buttercream!

Each bite is super moist with just the right amount of sweetness!

This recipe is adapted from Our Best Bites

Cupcake Ingredients:
1 white cake mix
2 eggs
1 cup sour cream
1/2 cup milk
1/3 cup vegetable oil
Decorations: yellow & red food coloring, candy corns and Halloween sprinkles


Frosting Ingredients:
1 cup un-salted butter
4 cups powdered sugar
1/4 teaspoon salt
1 teaspoon vanilla extract
1/3 cup heavy whipping cream

Directions:
Preheat oven to 350 degrees. Line a cupcake tin with paper liners.

Mix cake mix, eggs, sour cream, milk and oil until combined. Beat on medium-high speed for 3 minutes.

Divide batter in half and color one half orange and the other half yellow. I used McCormick Food Coloring. For the yellow batter, I used 50 drops of yellow food coloring and for the orange batter, I used 50 drops of yellow and 18 drops of red.

Start filling liners with 1 heaping tablespoon of orange batter. Then top with 2 tablespoons of yellow batter. Bake for 15-18 minutes. Let cupcakes cool, remove paper and decorate with a buttercream frosting, candy corn and sprinkles. Makes about 18 cupcakes.


In a mixing bowl, cream butter until fluffy. Add sugar and continue creaming until well blended. Add salt, vanilla, and whipping cream. Blend on low speed until moistened. Beat at high speed until frosting is fluffy. 


Happy Halloween!!

Wednesday, October 12, 2011

Black & White Halloween Wreath


This Fall I'm on a mission to craft on a budget!! So far, I have only spent $15 which includes 3 pumpkins. I only spent $2.00 to make this wreath!


I purchased the wreath form at the dollar store along with the ribbon. I made use of  newspaper, paint, paintbrush and glue that I had at home. I also used a scalloped circle punch to cut the newspaper but any shape can be used. 


My first step was to paint the wreath black before adhering any newspaper. Honestly, I would skip this step because I went back over it and filled in any spots that were showing through. Next, I went through and punched circles from 3 days worth of newspapers. I was so surprised and how much of the paper is in color these days so that is why it took so many newspapers. 


To adhere the newspaper, I wrapped each circle around the end of a pencil and dipped it in Elmer's glue and held it to the form for about 10 seconds. After covering almost half the wreath I started feeling like it was getting a little tedious. From start to finish it took me about 1 hour total. After covering the entire wreath, I flipped it over and let it sit for an hour before attaching letters that I cut out with the Cricut. 


I was really happy with how the wreath turned out! For $2.00, you can't beat it. This wreath can be dressed up with any Halloween embellishments. I think it would also look cute with some glittery bats, spiders or a witch's hat. 

Happy Halloween!!

Saturday, October 8, 2011

Fiesta Chicken (Slow Cooker)


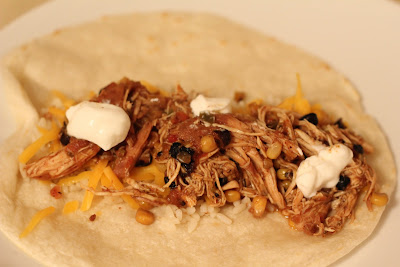
Sometimes I find it hard to take good pictures for the blog when a meal is smelling so good, I'm starving and my husband is waiting at the table to eat... This was one of those time. I really feel bad for the chicken because this picture does not give it any justice. The chicken turned out very flavorful and moist. It also re-heated great for leftovers the next day. 


I live in California where Mexican food is a staple. We turn anything we can into a taco or a burrito. This chicken can easily be combined with rice to make a Chipotle-style burrito bowl or throw it into a tortilla and add your favorite topping for a tasty taco. 


Another great thing about this recipe is that you can throw it together before you head to work. There is not browning required and there is minimal chopping needed. 


Ingredients:
1 1/2 lbs chicken breasts
1-16 oz jar of salsa
1-15 oz can of black beans, drained
1/2 lb frozen corn
1 Tbls chili powder
1/2 Tbls cumin (essential for true Mexican flavor)
1/2 Tbls minced garlic
1/2 tsp dried oregano 
1/4 tsp cayenne pepper
1/4 tsp salt
1/8 tsp black pepper


Optional Toppings:
Grated cheese, sour cream, diced onion or chopped cilantro


Directions:


Add all the ingredients, except the toppings, to the slow cooker. Give it a good stir to combine. Make sure the chicken is completely covered and close the lid. Cook on low for 8 hours. 


After 8 hours, remove the lid and use two forks to shred the chicken. Stir thoroughly and serve!


Enjoy!


Sunday, October 2, 2011

Halloween Oreo Pumpkin Cheesecakes


Fall is in the air and Halloween is right around the corner!! We finally got some cool weather in our area and I had the overwhelming urge to break out the PUMPKIN! 


This recipe was really easy to throw together and would be a fun family recipe.


This recipe is from Laren's Latest with only a few changes


Tools Needed:
Muffin pan
Cupcake liners
Mixer
Sandwich bag
Toothpick


Ingredients:
1-8 oz. package cream cheese, softened (reduced fat cream cheese can be used)
1/2 cup granulated sugar
1/2 teaspoon vanilla extract
1/2 cup pureed pumpkin
1 egg
1/4 teaspoon cinnamon
1/8 teaspoon nutmeg
2 tablespoons all purpose flour
pinch of salt
12 Halloween Oreos
1/4 cup chocolate chips 


Directions:
Preheat oven to 325 degrees


Line 12 muffin tins with cupcake liners. Place 1 oreo in the bottom of each cup. Set aside. 


In large bowl, whip cream cheese and sugar together until smooth. Stir in vanilla, pumpkin, egg, cinnamon, nutmeg, flour and salt until combined. Scrape sides of bowl and whip mixture until completely smooth. 


Spoon about 2 tablespoons of the mixture over oreos. Bake 25-30 minutes or until cheesecakes have set. Remove from oven to cool. Once cheesecakes are cool enough to handle, remove from muffin tin. Remove paper wrappers. 


Microwave chocolate chips in a sandwich bag in 10-20 second increments until completely melted. Once melted cut the tip off the corner of the bag and pipe melted chocolate in 3 circles on top of cheesecakes. Drag the end of a toothpick through the chocolate to create a spiders web look. Repeat with remaining cheesecakes. Refrigerate until ready to serve.


Happy Fall!!